A new found like: Pattern testing

So this week was “a little bit of this and that”.

Firstly, I enjoyed Pattern testing a gorgeous new pattern launched today over at http://www.littlemoodesigns.etsy.com for a children’s Messenger bag.  It is large enough to fit all their “necessary items” in, but small enough to limit them to a few items rather than their entire toy collection ;-).  The length of the strap is perfect for my 5 year old !

A Messenger Bag:  Pattern by Little Moo Designs

A Messenger Bag: Pattern by Little Moo Designs

Kylie has included this appliqué and others for the boys, with her pattern.  These birds are divine.  The pattern is simple to follow, with lots of pictures which is fantastic!  The frills are my little touch.  My little miss LOVES her new bag and stated “now I just need an iPhone mum, so I’m like you”.  Yes, well as you can imagine I just laughed this off and thought “there is NO WAY”.

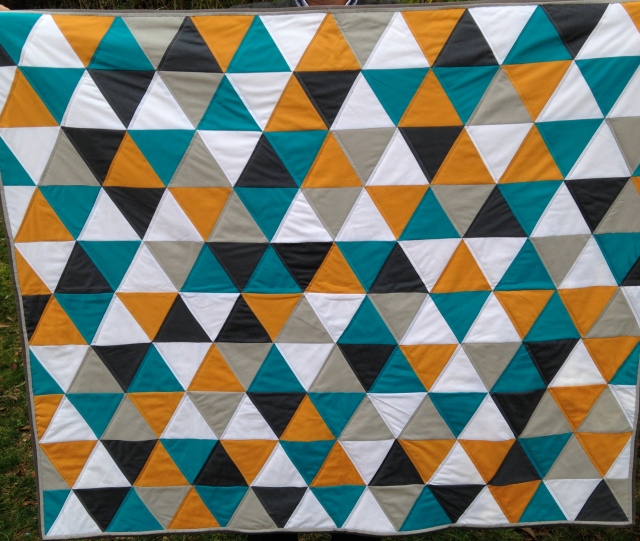
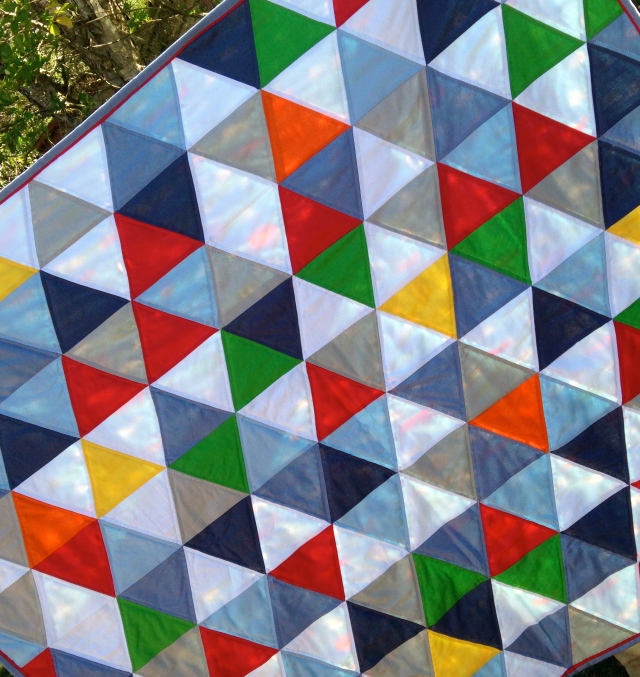
I have also commenced another custom quilt.  The designing stage has started with graph paper and coloured pencils.  I find this stage very therapeutic!  Until the anxiety sets in, with the question “I wonder if the client will like this?”  However, with this order I do have an advantage, as the client has asked me to match a bassinet knitted blanket from http://www.uimi.com and make a cotton cot quilt.

This is what I have so far, and I’ll be sure to post the final product.  There is something about a geometric design – that gives it that “funky” edge to it, don’t you think ?

Design process - graph paper and coloured pencils.

Design process – graph paper and coloured pencils.


The other custom order I completed this week was for a lovely handmaiden I have got to know through this computer medium, who makes the most stunning jewellery and is also a graphic designer (shhh!  just to let you know she also designed my logo – isn’t it fantastic!).  You can find Louise at http://www.radgedesign.com.au and her hand-made store http://www.hand-made.com.au/radgedesign .


This piece is called- Lolita - definitely my favourite piece at the moment

This piece is called- Lolita – definitely my favourite piece at the moment


I created an A4 stationary folder for her design book etc (I added a surprise too, but can’t tell here yet, as it hasn’t arrived and I’m sure she’ll read this).

A4 stationary folder

A4 stationary folder


This folder has been created from Art Gallery Fabrics designed by Andreae Victoria.  The outer fabric is stunning, and is complemented by the interior.

Interior of A4 Stationary folder.

Interior of A4 Stationary folder.


I started making these for my children a while ago, as they are great to take about.  It can be converted to hold crayons or pencils, colouring books, plain note paper or whatever is going to occupy the children for at least 5 minutes !!  If you would like one, simply visit my etsy store at http://www.sewnbyleanne.etsy.com.

This week seems just as busy which is great, plus it is still the school holidays here, so always a little chaotic.

Have a great week.

Blessings

Leanne


Posted in Sewing | Tagged , , , , , , , , , , , , , , , , , , | Leave a comment

A little girl’s dream

It has been a busy weekend for our family, but I certainly filled my daughter’s heart with joy today.

As usual I needed to go to the fabric store, this was essential as the 40% off voucher finished today !!  My daughter wanted to come also.  She loves going through the craft section and looking at everything she could create.

She wrote these words at school this term.  So who knows what the world has ahead of her !!  Hopefully love, joy and loads of happiness!!

Cate wanting to be an artist

I’m sure once I show you the next photo, you will know exactly what I created for her after she choose this gorgeous blue chiffon !!

IMG_5337

Yep, that’s right I made her an “Elsa Cape”, so she could flitter and dance to the music to her hearts’ content these school holidays.

IMG_5347


The glitter, that doesn’t show up that well on the photo is now all over the furniture, but it has been worth it to see her happy and dancing around.  Her three brothers well between you and me  – are a little over (well maybe A LOT) the “Frozen soundtrack”.

I spent a lot of time with the kids today – I think it was out of guilt for spending a day at the Quilt Fair yesterday – KID FREE !!  Oh the quilts were amazing.  But that it all for the next blog post. Hee Hee

Have a fabulous week.

Blessings,

Leanne

Posted in Beautiful things for Kids! | Tagged , , , , , , , , , , , , , , , , | Leave a comment

Hand piecing a soccer ball pin cushion

A fews weeks ago I entered a Pageant !!  No, not for myself but for PIN CUSHIONS !  Yes, it is a bit of fun amongst a group of fabulous handmaidens after seeing elaborate pin cushions popping up in Pinterest at the moment.  Make sure you check it out over at http://www.facebook.com/crazylyka .  So I thought I’d let you in on my entry AND at the same time create a small hand piecing tutorial on hexagons.

After creating my “Floral Delights”  Quilt I had a number of scraps – so you will recognise numerous fabrics.

First of all, we need our hexagon templates.  you can buy them at any craft/sewing store, however you can also make your own from scrap paper – and here is mine.

2.5" Hexagon template

2.5″ Hexagon template

I also cut a hole in the middle to put the pin through,  to hold the paper to the fabric.  I then cut the fabric around the template leaving at least a 1/4″ seam.  Note:  the smaller the seam you use, the more fiddly the hand sewing.

2.5" hexagon template with fabric

2.5″ hexagon template with fabric

You then need a basting thread that stands out from the fabric (Note: the more it stands out the easier it is to pull out!).

Basting the edges of the Hexagon

Basting the edges of the Hexagon

Only baste the fabric (not the paper), otherwise you won’t be able to remove the paper!!  Be careful and take time to create sharp corners!  This makes it easier to sew the hexagons together.

2.5" Hexagon

2.5″ Hexagon

Front of the 2.5" Hexagon

Front of the 2.5″ Hexagon


As the pattern I was following to make the pin cushion was my son’s soccer ball,  I needed 20 hexagons and 12 pentagons.  Who knew I’d be using geometry ?!

I needed to make sure the pentagon sides were 1″, the same as the hexagons.  Here I just googled 1″pentagon and printed off the initial template shape and then replicated this on my own paper.

1" sided Pentagon

1″ sided Pentagon

I used the same method as above to create 12 pentagons and 20 hexagons.  Make sure you press the shapes before starting to construct, as this helps hold their shape.

To construct the ball I surrounded each pentagon with 5 hexagons.  It was fascinating to see the ball shape gradually appear !!  You connect each shape to each other with ladder stitch.

Construction of pincushion soccer ball.

I keep the pins and paper in as I construct to give the walls a little bit more strength.  As you will not see inside of the ball, you can choose to remove the basting stitches or not – this is a personal decision. (Just remember to remove the pins!!)

The final result!

Hexagon Soccer ball Pin cushion !

Hexagon Soccer ball Pin cushion !


It reminds me of a baby’s ball.  As this is a pin cushion, I filled a pocket of fabric with rice to put at the base to give weight!  And filled the ball with polyfill – tightly as remember this is a pincushion !  The embroidery of Sewn by Leanne is my little touch for the pageant.


IMG_5083

Embroidery to the Hexagons

This is a very cheery pincushion 🙂

I hope you have enjoyed learning a little bit about English Hand piecing.  I enjoy doing it in front of the television at night.

Enjoy the rest of your week!

Blessings, Leanne


Posted in Tutorials | Tagged , , , , , , , , , , , , , , , , , , , , , , , , , , , , , | Leave a comment

“Floral Delights”

Well,  in amongst the Quilt orders I have been doing, I have created a stunning Single bed Quilt.  My brief was to create a quilt and pillowcase for a girls bedroom.  YAY!! it is finished !!

Image

This Adorable Quilt named “FLORAL DELIGHTS”  has been made from beautiful fabrics from stunning designers Michael Miller,  Riley Blake, Robert Kaufmann and from my beloved Tilda stash.

The Basic Design is from the a Riley Blake Quilt top pattern “Squared Up”.  I have embellished the Pattern with 4 Hexagon flowers which have been hand-pieced and hand sewn together and then machine appliqued to the quilt top.

The back has been designed by myself.  I like to have fun with both sides of the quilt and bring the front and back together.  Image

Here I have used Michael Miller Flight Fancy as it is bright, fun and the spots have all the colours that in the top.  To incorporate the patchwork I created a 4″ column of all the fabric I used in the quilt top.  To create a garden effect I used a gorgeous pink owl fabric (sorry I can’t remember the name 😦 ).  The advantage of creating this column offset from the middle is I didn’t need to match up the pattern.

This quilt now has two sides !!  Even better.

The pillowcase has been made once again from the Michael Miller fabric “Flight Fancy” with White Kona solid from Robert Kaufman fabrics. To bring the patch work in once again to the pillowcase I created Bias binding from the left over scraps of the quilt top border – simply stunning.

Details of Quilt  “Floral Delights” (55″x65″):

Front:  Various fabrics from Riley Blake, Michael Miller, Robert Kaufman and Tilda Fabrics.  Modified Squared Up pattern from Robert Kaufman.  Hand Pieced Hexagon Flowers.

Back:  Michael Miller “Flight Fancy”.  Design by Sewn by Leanne.

Batting:  100% Cosy Cotton

Quilting:  Machine Quilted by Sewn by Leanne in a circular motion.

Binding:  Michael Miller “Flight Fancy”

Standard Size Pillowcase (20″x30″):

Front: Michael Miler “Flight Fancy” and Robert Kaufman’s White Kona Solid
Back: Michael Miller “Flight Fancy”
Designed and made by Sewn by Leanne.


“Floral Delights” has been created for Collaboration for a Cause 2014 – A charity Auction created by Australian Handmaidens to support numerous Charities.

Image

This is a fabulous way to give back to our community………. I have so enjoyed being part of this Collaboration and ca’t wait to see what the other businesses in my group have created for our Girls bedroom !!

Have a great week.
Leanne

Posted in Quilting | Tagged , , , , , , , , , , , , , , , , , , , , , , , , , , | 3 Comments

Double Colour Binding Tutorial

My first Tutorial is on Double Colour Binding.

I love the effect the two colours have on my Quilts at the moment.

 A SPLASH of COLOUR and an extra touch of design !!

Look how the two colours highlight the bright Pink and Orange in the border of this Quilt.

PInk/Orange Robert Kaufmann Kona Solids

Pink/Orange Robert Kaufmann Kona Solids

Double Colour Bias Binding  effect on a gorgeous Quilt

Double Colour Bias Binding effect on a gorgeous Quilt

Materials Needed:

1/2 yard pink fabric (fabric seen on the back of your quilt)

1/2 yard orange fabric (fabric seen as the internal border of the binding)

cotton/ iron/ sewing machine/ rotary cutter and cutting board


Method to create 2 1/2″ binding (straight):

1.  Cut strips of your fabric:

Pink fabric (back) : Cut 6 strips 1 1/4″ wide x WOF (Width of your fabric)

Orange fabric (internal):  Cut 6 strips 1 3/4″ wide x WOF

2. Sew one of each colour strip to the other.  You should have 6 strips looking like this

Step 2.  Joining the two colours.

Step 2. Joining the two colours.

3. Iron flat, pressing the seam towards the backing colour (in this case Pink).

4. Joining the strips.  Place two strips at Right Angles

Two strips at right Angles

Two strips at right Angles

Pin so that they don’t move.  Draw a 45 degree line between two diagonal corners (as pictured).  Make sure the line crosses where the middle seams cross as this will ensure a point to point match of the two strips.

Then sew along this line.  Check that the points match as below,  then cut the excess fabric to a 1/4″ seam.

5.  Repeat step 4.  until you have the length of continuous binding desired for your quilt.  (Note: I have an app on my iPhone called Quiltcalc from Robert Kaufman that calculates the length of binding I need for a quilt – free to download too!)

Continuous Double Colour Binding

Continuous Double Colour Binding

Then press seam open and flat.

6.  Then double the binding in half and press.  So that it is ready to apply to the quilt when needed.  I cut the end of the binding at 45 degrees and fold 1/4″ , so it has a neat finish on the quilt. (as pictured)

Finishing the ends of the binding.

Finishing the ends of the binding.

7. Roll the Binding into a ball and you have a beautiful roll of your own binding.

PInk/Orange Robert Kaufmann Kona Solids

PInk/Orange Robert Kaufmann Kona Solids

Note: I did not cut my strips on the Bias. You can, but it takes more fabric and is not needed to bind a square/rectangular quilt nicely with mitred corners.

The trick with applying this binding to your quilt:   You need to machine sew it to the BACK of your quilt and hand sew the binding to the front of your quilt.

My next tutorial will show you how to attach your double colour binding to your gorgeous quilt.

I hope you have enjoyed this tutorial.  I’d love to see the colour combinations you come with !!

Blessings

Leanne


Posted in Tutorials | Tagged , , , , , , , , , , , , | 1 Comment

Basting with a Smile

This weekend has been extremely crazy, but amidst the chaos I have been able to baste a Panel Quilt that has certainly made me smile.


Strawberry Shortcake Panel Quilt Basted

Strawberry Shortcake Panel Quilt Basted

These Basting Pins (curved safety pins) are certainly helpfully tools.   They hold the three layers together very well, and are very easy to remove as you go.

Using Gutermann Sulky thread 1108 (light pink) I have Free Motion Quilted (FMQ) the Panel, highlighting her lovely smile and the hair.

Example of Free Motion Quilting

Example of Free Motion Quilting

The action of FMQ is great to do on these Panel Quilts as they allow you to practice the Art.  My freeform on the larger quilts has really improved since doing these smaller quilts. Taking the lines already printed on the fabric, but then making it my own by elaborating on these.  It also makes each Quilt I make definitely unique, despite the mass produced Panel being used.  This Panel is part of the Strawberry Shortcake range from Spectrix Fabrics.   The flowers beside her definitely are highlighted through the FMQ technique (as seen below).


FMQ Flowers

FMQ Flowers

You don’t need to quilt every line.  Just decide what you would like to highlight in the quilt and GO FOR IT !!  It is much easier to this with a FMQ foot than a regular machine foot.  A FMQ foot is certainly worth the investment, if you like making Panel Quilts.

I’d love to see your FMQ Art on Quilts.  There are certainly beautiful examples, and I am by no means an expert, but it’s a technique I love to do to, and love it’s effect on quilts.

The following Quilt is one of my favourite!

Rainbow FMQ - Small Town Thread


The FMQ on this Quilt from Small Town thread (www.smalltownthread.wordpress.com) is simple but has such a lovely effect creating a textured rainbow sky.  I love it !!

Have a lovely week ahead.

Blessings,

Leanne

Posted in Quilting | Tagged , , , , , , , , , , , | Leave a comment

Equilateral Triangle Quilts

I have been having lots of fun making two Quilts for a Christening.   The colours chosen were inspired by their Christening invitations.

One boy has Hot Air balloons on his walls and the other has Robots……….

Equilateral triangle Quilts

The front and back panels complement each other. These One of a kind Quilts are certainly made to be treasured.

In the “Up, Up and Away”  Quilt with the rainbow colours I used invisible thread as not to take away from the stunning rainbow effect and at the back used white.  In the “Robotic Triangle” Quilt I used Silver thread to keep with the mechanical theme.


IMG_4687

IMG_4287

I just love the backing fabrics on these quilts.  The robots are from Timeless treasures “Mechanical Genius” and the Hot Air Balloons are from Robert Kaufaman fabrics “Out N’ About.

I have put these quilts in my Etsy store http://www.sewnbyleanne.etsy.com  and will link up with Sew Cute Tuesday  over at Blossom Heart Quilts tonight as they have a theme on Triangles.

I struggle with describing Quilts to advertise them.  So if you have any great adjectives please feel free to share…..

Have a great day

Back soon

Leanne

Posted in Uncategorized | 10 Comments

A long weekend of kids craft

It has been a long weekend here in Melbourne, and there has been a lot of kids craft being done.

Miss 5 has absolutely fallen in love with making bracelets from colourful rubber bands. Apparently it is the latest rage at school. And to my surprise our sons enjoyed making them too (as long as they didn’t have pink and purple in them !). The four kids have been wearing them all weekend, and the older three complained when I warned them that they can’t wear them to school tomorrow.

20140310-223526.jpg

Is this a craze at your children’s school? I’d be especially interested to hear whether this is done in other countries at present. I can’t believe how many patterns you can make with rubber bands!!

The other craft activities that we discussed and tried out – are those for Easter. A few pictures our children found are:

20140310-223806.jpg

20140310-223825.jpg

20140310-223837.jpg
The chickens made from the egg cartons, and painted. We plan the fill them with the tiny Easter eggs and give them to friends. We had three egg cartons from the recycle box, but it is safe to say our family might be eating a number of eggs prior to Easter to have enough carton chicks !! What kind of Easter craft traditions does your family practice… I’d love to hear them.
Have a great week…
Leanne

Posted in Uncategorized | Tagged , , , , , , , , , | Leave a comment

Creative Inspiration


I found these gorgeous Winnie the Pooh fabrics on sale at Minky Bear Fabrics during January, at about the same time as Nicole from Lil’ Miss A advertised places for a Childhood Memories Showcase.  They just seemed to fit together perfectly, and now so do the fabrics.  

This is a Gorgeous Cot Quilt.  My eldest Master 9 is still very attached to his Winnie the Pooh, and hence we still have same collection of softies that live in the Hundred Acre Wood.  Creating this Quilt brought back many memories of being a first time Mum, the idea of chaos and no routine entering our lives.  Tigger was also a favourite, and always an encouragement to teach our second son Master 7 to jump “Come on let’s jump silly like Tigger”.

Image

This 40″ x 45″ cot quilt also gave me a chance to practice the skill of free motion quilting.  I’m really enjoying learning this technique – so much easier than moving the whole quilt around continually with a walking foot (and yes I can hear experienced quilters gasp, and say you really did that !). 

This quilt will be available in the  Childhood Memories Lil’A Showcase opening 8pm 5th March, 2014, AESDT.  There are many more gorgeous items that you will love.  So stop by and take a look……..

Have a great week,

Blessings,

Leanne

Posted in Uncategorized | Tagged , , , , , , , , , , | 2 Comments